
Learn a Repeatable Curveball Without Forcing the Arm
See the curveball grip, release cue, age guidance, practice progression, common fixes, and workload boundaries for developing pitchers.
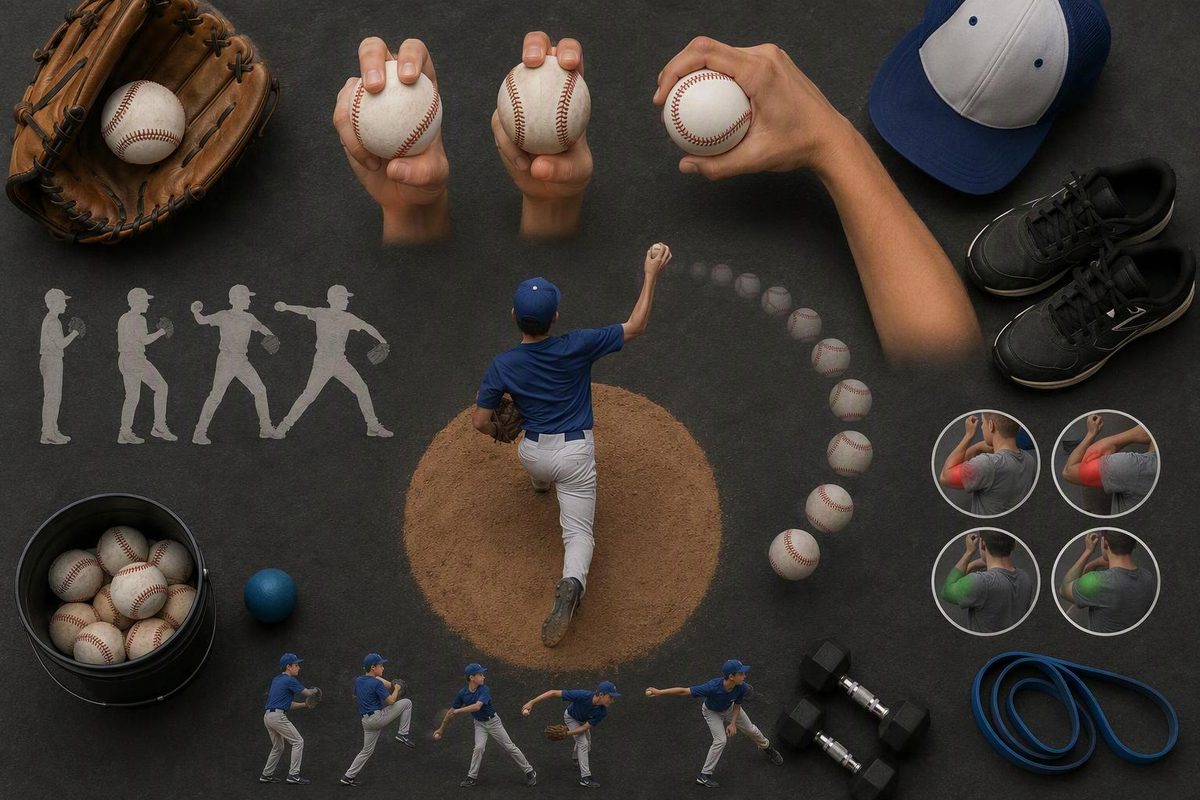
A basic curveball starts with the middle finger against a seam, the thumb underneath and a delivery that resembles the fastball. At release, pull down the front of the ball with the middle finger to create forward rotation. Do not slow the arm, force a different arm slot or violently twist the wrist to manufacture break.
There is also a development gate. MLB Pitch Smart advises pitchers ages 9–12 to avoid pitches other than fastballs and changeups. For ages 13–14, breaking pitches can be introduced after the pitcher has developed a consistent fastball and changeup (Pitch Smart ages 9–12; Pitch Smart ages 13–14). A younger or less-developed pitcher is better served by learning the four-seam fastball grip first.
Enter the pitcher’s age and current pitch development to check the cited readiness guidance.
Pitcher Readiness
What To Do
Build the fastball and changeup first
For an age 13–14 pitcher, the cited Pitch Smart guidance supports introducing breaking pitches only after both pitches are consistent.
- Keep working on fastball command.
- Develop a repeatable changeup.
- Do not add curveballs as extra throwing volume.
Source: MLB Pitch Smart guidance for ages 9–12 and 13–14, as cited in the article. The cited guidance does not provide an age-specific answer here for other ages.
Set the Middle Finger Against a Seam
Use this standard grip as a starting point rather than forcing the hand to match someone else’s exactly:
- Put the middle finger against a seam. Turn the ball until a long seam gives that finger a clear edge to pull against.
- Place the index finger beside it. It can rest on the leather or lightly against the middle finger.
- Set the thumb on the opposite side. Start with it roughly beneath the middle finger. Move it slightly if another position makes the ball easier to control.
- Hold the ball snugly. A curveball commonly sits deeper in the hand than a four-seam fastball, but it should not require a hard squeeze.
- Favor the middle finger. Keep that finger connected to the seam while the index finger stays comparatively relaxed.
These are the central features of the standard grip described by Driveline Baseball: the middle finger uses a seam, the index finger sits beside it and the thumb supports the opposite side. Hand size and finger length can justify small adjustments.
Grip checkpoint: Hold the ball securely without creating obvious tension in the hand or forearm. If that requires a hard squeeze, rotate the ball or adjust the thumb before throwing.
Keep a Fastball-Like Delivery
Keep the same basic leg lift, direction and tempo used for the fastball. The grip and release change; the pitcher should not rebuild the entire delivery around the curveball.
As the hand approaches release:
- Let the hand move slightly to the side of the ball so the fingers can get in front of it.
- Pull down the front of the ball with the middle finger.
- Let the ball roll off that finger with forward rotation.
- Continue into a normal follow-through rather than stopping the arm after release.
Use one cue: “Middle finger down the front.” Driveline likewise describes getting the fingers in front of the ball and pulling down to create a topspin component. That forward rotation contributes to the pitch’s downward movement.
A curveball does not need a perfect “12-to-6” shape. Arm slot and release influence its movement: higher slots tend to produce a more vertical shape, while lower slots commonly add more glove-side movement. Do not force a pitcher into a higher arm slot just to copy someone else’s curve.
Avoid Forced Movement
- Do not wrench the wrist. Let the hand reach its release position as the arm continues through; do not add a violent last-second twist.
- Do not slow the arm on purpose. Guiding the ball can produce loose spin and make the pitch easier to recognize.
- Do not change the stride to create break. Build the pitch around the delivery the pitcher can already repeat.
- Do not chase maximum movement immediately. Repeatable spin and target control come first.
If the pitcher cannot yet repeat a balanced delivery, return to the ground-up throwing sequence before adding another release pattern.
Learn the Pitch in Four Steps
Introduce the curveball during a supervised practice rather than for the first time in a game. These throws belong inside the planned throwing session, not on top of it as extra workload.
1. Rehearse the Grip
Set the grip, check hand tension, remove the ball and repeat. The pitcher should eventually be able to find the seam without searching for several seconds.
2. Make Short, Easy Throws
At a comfortable catch-playing distance, make a few low-intent throws. Watch the rotation rather than demanding a large break. A ball marked with a stripe around its circumference can make the spin easier to see during practice.
Pause if the pitcher must yank the arm across the body, force an unfamiliar arm slot or throw harder just to make the ball move.
3. Progress to Flat Ground
Increase the distance gradually while keeping the same release cue. Mix an occasional curveball among fastballs instead of throwing a long block of breaking balls. From the side, compare the deliveries: the direction and tempo should look similar even though the grip and release differ.
4. Add a Small Bullpen Set
After a complete baseball warm-up, include a small number of curveballs within the normal bullpen. Start by sending the pitch through the same general release window as the fastball and aiming for a target near the lower part of the strike zone.
Judge the set by three observable outcomes:
- The pitcher stays balanced and finishes normally.
- The ball shows a repeatable forward-spinning pattern rather than an inconsistent wobble.
- The pitch starts on the intended line often enough to be used for a strike or a purposeful chase pitch.
Fix One Problem at a Time
The ball comes out flat: First give the middle finger a clearer seam edge and reduce excess index-finger pressure. Then retry the cue “middle finger down the front.”
The ball has more sideways movement than expected: That may fit the pitcher’s natural arm slot. If the intended shape is more vertical, check whether the hand is sweeping around the ball—but do not force a new arm slot.
The pitch floats high: Check for a guided release or visibly slower arm before changing the grip. Match the fastball’s tempo at an easy overall throwing intensity.
The pitch repeatedly hits the ground: Do not automatically demand an earlier release. Check whether the pitcher stayed balanced, then adjust only one variable—target, grip or release cue—for the next few throws.
Every pitch has a different shape: Keep the same grip for the practice set. Switching constantly among standard, spiked and knuckle-curve grips makes useful feedback difficult. This is a practical application of the idea that practice makes permanent.
Keep Curveballs Within Workload Limits
Pitch type is not a substitute for workload management. A Little League summary of a multiyear observational project reported no clear evidence that throwing breaking pitches early was itself an injury risk factor; it identified overuse as the primary concern (Little League).
In a laboratory study of 36 college-aged pitchers, fastballs produced greater measured shoulder and elbow moments than curveballs—but joint moments in experienced adults are not injury rates, and the findings do not guarantee safety for a youth pitcher (Sports Health).
Follow the player’s league pitch-count and rest rules, count throwing across every team, and do not add curveballs when fatigue changes command or mechanics. All pitches count toward the workload, not only breaking balls.
Stop throwing when a young player develops elbow pain or swelling, a “pop,” numbness or tingling, restricted motion or locking. The American Academy of Orthopaedic Surgeons advises children to stop throwing when those symptoms appear. Pain that persists after rest or returns when throwing resumes needs medical evaluation, not another grip adjustment.