
Build a Better Throw From the Ground Up
Start with a four-seam grip, build balance and direction at low intensity, then progress through release work, stationary drills, and complete throws.
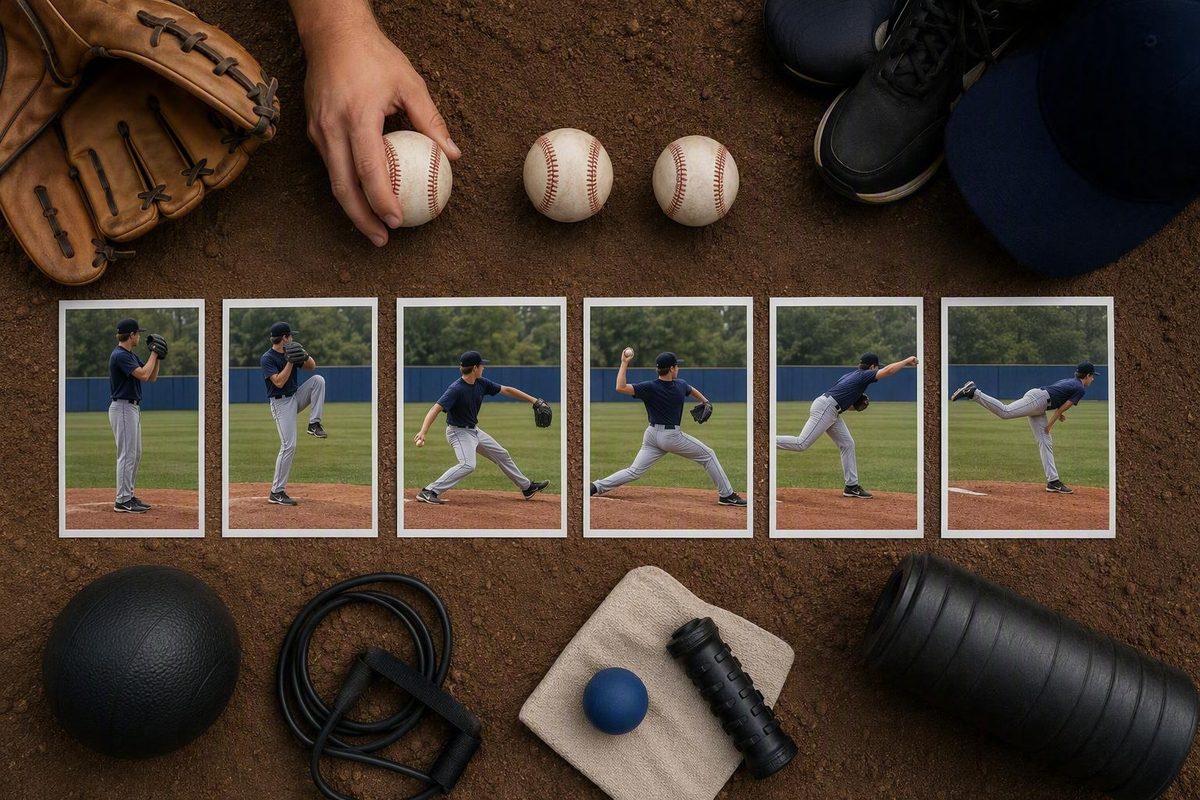
Good baseball throwing mechanics begin with a coordinated, full-body sequence—not an isolated arm action. For developing pitchers, that means establishing balance and direction, loading the back side, moving toward the target, rotating from the lower body through the trunk, allowing the arm and hand to complete the throw, releasing through the fingertips, decelerating naturally, and finishing under control.
Learn that sequence at low intensity before adding distance or speed. The goal is not to copy one ideal delivery. It is to develop a repeatable movement in which direction, accuracy, balance, and effort remain organized.
The throwing sequence at a glance
Use this checklist before worrying about detailed arm positions:
- Establish an athletic, balanced setup.
- Align your body toward the target.
- Load without drifting off line.
- Move forward and transfer weight.
- Begin rotation from the lower body, followed by the trunk.
- Accelerate the throwing arm and hand.
- Release through the fingertips.
- Allow the arm and body to decelerate.
- Finish balanced, with momentum directed generally toward the target.
A formal analysis often divides an overhand throw into six descriptive phases: wind-up, stride, arm cocking, acceleration, deceleration, and follow-through. Arm cocking may be divided further into early and late portions. This throwing phase model provides useful vocabulary for identifying when a movement occurs, but it does not establish one ideal delivery, exact timing pattern, or set of joint positions for every athlete.
For beginner instruction, the same motion can be simplified into setup, load, move, rotate, throw, release, and finish. Coaching resources commonly describe the sequence as beginning with the legs and hips, continuing through the torso, and ending with the arm and hand. Think ground up, not arm first.
They should not become a series of forced pauses, nor should every pitcher be expected to reach identical positions.
Pitching also requires a more specialized delivery than ordinary throwing. Catchers, infielders, outfielders, relay players, and athletes throwing on the run still use broad principles such as balance, direction, sequencing, and follow-through, but their footwork, timing, distance, and intent differ. Those comparisons can help a developing pitcher understand which fundamentals are shared and which parts of a mound delivery require pitching-specific instruction.
Setup, grip, and direction
A four-seam grip is a practical starting point for ordinary throwing practice:
- Place the index and middle fingers across the seams.
- Put the thumb underneath the ball.
- Hold the ball securely without squeezing excessively.
- Leave some space between the ball and palm when hand size allows.
It is a common teaching choice, not a universally optimal grip for every athlete, pitch, or game situation.
Hand size matters. A young player who cannot hold the ball comfortably should adjust the finger spacing rather than force an adult-sized palm gap. In one beginner lesson, two fingers are placed across the horseshoe for a baseball, while three fingers are used specifically for a softball. That lesson also begins with the ball and glove near the center of the chest and uses the shoulders—not the chest itself—pointed generally toward the target as an initial alignment cue (Pro Baseball Insider’s beginner throwing instruction).
Begin in an athletic posture with soft knees and your weight controlled over your feet. Bring the hands near the center of the chest. For a basic stationary throw, turn so the glove-side shoulder points generally toward the target. This establishes a clear throwing line while leaving room for the hips and trunk to rotate.
Use light but secure grip pressure as a beginner coaching cue. The ball should feel controlled without obvious tension spreading through the hand, forearm, or shoulders.
Clean backward rotation can provide feedback during short-distance practice. Watch whether the seams rotate consistently and whether the ball appears to leave the fingertips cleanly. Do not diagnose an entire delivery from spin alone.
Move from the ground up
Once the setup and grip are comfortable, organize the throw in this order:
Load and establish direction → move the lower body → rotate the trunk → let the arm and hand complete the throw.
Load without losing balance
Shift into the back side while keeping the head and body controlled. The load should prepare forward movement, not become a large sway away from the target. If the player must make a major correction before moving forward, simplify the motion or reduce the effort.
Useful checkpoints include:
- The player remains balanced during the load.
- The first move carries the body toward the target.
- The stride or step does not pull sharply across the body.
- Weight transfers forward instead of remaining entirely on the back leg.
- The player can complete the throw without falling sideways.
These observations are more useful for beginners than prescribing an exact stride length or joint angle.
Organize the front side
The glove arm can begin “up and strong” and then move toward the chest as the body rotates. Treat this as an organizing cue, not an instruction to yank the glove backward.
Some youth instruction also uses compact hand separation and a “fingers near the ear” cue. They are not scientifically established universal positions and should not be forced onto every pitcher or every type of throw.
Let rotation connect the lower body to the arm
As the player moves forward, the lower body begins the action and the trunk follows. The throwing arm then accelerates as part of that connected sequence.
“Ground up” should not become a rigid list of stops. The throw is continuous, with one part beginning while another is still moving. The cue is intended to discourage the common beginner habit of keeping the body still and trying to create the entire throw with the arm.
Anatomy, age, position, distance, intent, and the task itself influence the motion. Even for pitchers, this general sequence does not prescribe mound-specific timing, leg lift, stride geometry, trunk position, or release point.
Release, deceleration, and balanced finish
The release is the moment the ball leaves the hand, but it is not the end of the throw.
For basic practice, feel the ball leave through the fingers rather than being pushed from the palm. One throwing-drill resource emphasizes fingertip release, identifies the middle finger as a primary influence, and uses backward rotation with stable-looking seams as feedback during short release work (White Rock South Surrey Baseball’s throwing drills). These are coaching priorities, not proof that one spin pattern diagnoses the full delivery.
After release, the body continues through deceleration and follow-through. Do not ask the player to freeze the arm or stop abruptly.
Use three finish checks:
- Direction: Did momentum continue generally toward the target?
- Freedom: Was the throwing arm allowed to continue rather than being consciously stopped?
- Control: Could the player regain balance and prepare for the next throw or play?
A particular follow-through does not guarantee velocity, command, accuracy, or protection from injury.
Evaluate several throws before changing mechanics. A single ball can slip, catch a seam, or leave the hand earlier than intended. If the same result appears repeatedly, check the simplest variables first: grip, distance, direction, balance, and timing.
A four-step drill progression
Progress from a small part of the throw to the complete movement. Keep early throws short and controlled, and add complexity only when the player remains balanced and accurate.
Step 1: Flipping Ball Drill
Stand close to a partner or net. Make short tosses with a comfortable four-seam grip, focusing on how the ball leaves the fingertips. Observe the rotation instead of trying to throw hard.
Cues:
- Keep space between the palm and ball when hand size allows.
- Use secure but comfortable grip pressure.
- Let the fingers guide the release.
- Look for repeatable backward rotation.
Move on when the player can produce controlled tosses with reasonably consistent rotation and without visible gripping tension. Do not chase a perfect spin axis on every attempt.
Step 2: One-Knee or upper-body throwing
From one knee—or another stable, low-intensity position—practice hand separation, arm action, fingertip release, deceleration, and follow-through. Keep the distance short enough that the player does not need to overthrow.
It is not a complete throwing pattern, a rehabilitation program, or a proven way to increase performance or reduce injury risk.
Step 3: Balanced stationary or standing power position
Stand sideways to the target with the feet in a comfortable base. Load into the back side, move forward, rotate, throw, and finish balanced.
Check for:
- A controlled back-side load.
- Movement toward the target.
- Forward weight transfer.
- An organized glove side.
- A finish the player can hold briefly.
If balance disappears, reduce the effort or shorten the distance before trying to rebuild the arm action.
Step 4: Step-behind or full throw
Begin slowly enough that the footwork remains organized.
When the sequence is repeatable, progress toward the delivery or position-specific footwork the player needs. Add speed or distance one variable at a time. If either causes the player to lose direction, balance, or lower-body contribution, return to the previous level.
A compact source-based practice block can use:
- 15 minutes: gradual interval throwing for a healthy player, beginning with easy short throws and increasing only while movement stays controlled.
- 2 minutes each: one-knee throwing, upper-body throwing, balanced stationary work, and balanced stationary work with the upper body.
- 5 minutes: controlled flat-ground throwing.
Those durations come from a USA Baseball youth pitching and catching practice plan. Release work may be incorporated at short distance before the timed stations rather than assigned an unsupported fixed duration.
Reduce the distance or intensity when accuracy, balance, rhythm, or movement quality deteriorates noticeably. As a general precaution, a mechanics session should not be used to interpret or work around pain. This guide does not replace evaluation by a coach or medical professional who can observe the individual athlete.
Adjust the throw to the position and play
All baseball throws can draw on secure grip, balance, direction, sequencing, and follow-through. They should not all use the same exact motion.
| Situation | Main priority | Typical footwork | Change from a stationary throw |
|---|---|---|---|
| Pitching | Repeatable delivery and command | Wind-up or set-position pattern | Mound-specific phases, timing, and intent |
| Catcher throw | Fast exchange and direction | Compact feet aligned to the base | Shorter transfer and faster release |
| Infield or relay | Quick transition and accuracy | Shuffle, replacement, or relay steps | Less setup time and a compact action |
| Outfield or on the run | Carry and body control | Crow hop, step-behind, or running steps | More momentum and variable arm angles |
A pitcher’s delivery is specialized enough that this foundation should not be treated as a complete pitching-mechanics prescription. Mound slope, leg lift, stride, trunk timing, pitch intent, command, and workload require pitching-specific observation.
Catcher instruction offers a useful example of why the throw must fit the role. Teach the exchange first, rehearse the footwork without throwing, and then combine the complete movement. In the catch-turn-take exchange, the catcher receives the pitch, turns the glove toward the bare hand, and takes the ball out with a four-seam grip rather than flipping it loose. That order follows USA Baseball’s catcher drill progression.
Infielders and relay players often need quick transitions and compact actions. These variations are reminders not to force a pitcher—or any other player—into one universal arm slot.
Troubleshoot the result without guessing
Ball flight is evidence, not a diagnosis. Look for a pattern across several throws, then check the easiest variables before changing the arm action.
| Result | Check first | Then observe |
|---|---|---|
| Ball sails or spikes | Distance, fatigue, grip security | Release consistency, balance, direction |
| Arm-side or glove-side misses | Shoulder alignment and footwork | Front-side action and whether the finish pulls off line |
| Weak carry | Balance and lower-body use | Forward transfer and completion of the throw |
| Sidespin | Grip, seams, and finger contact | Hand position, release, direction, and arm angle |
For repeated sailing or spiking, move closer and reduce effort. Check whether the grip remains secure and whether the movement has changed as the session progresses. Only then examine release timing or arm action.
For repeated misses to one side, mark a straight target line on the ground. Observe whether the feet move toward that line, whether the shoulders begin in a workable alignment, and whether the torso or finish pulls away from it.
When a throw lacks carry, avoid immediately telling the player to throw harder. Check whether the lower body contributes, weight transfers forward, and the athlete completes the throw instead of stopping at release. A shorter distance can make the sequence easier to observe.
With sidespin, inspect seam orientation, finger placement, hand position, and how the ball leaves the fingertips. Sidespin does not prove one particular mechanical fault, especially on game throws made from lower or changing arm angles.
A phone camera and marked target can make patterns easier to see. Record several throws from a safe side or rear position, with nobody standing in the throwing lane. Use the video to compare direction, balance, and repeatability—not to diagnose a player from one frame or replace a qualified coach.
Practice safely and measure what matters
For beginners and developing pitchers, progress should first appear as more repeatable direction, more target hits, cleaner observable rotation, balanced finishes, and steadier effort. Velocity can be measured later; it does not need to turn every session into a maximum-intent test.
Use a simple practice log:
- Throws attempted.
- Target hits.
- Throws with clean, observable backspin.
- Balanced finishes.
- Throwing distance.
- Any noticeable decline in accuracy, rhythm, balance, or movement quality.
The system does not need to be sophisticated. A chalk box, taped net target, and phone video can provide useful feedback. Advanced systems can measure velocity, spin, movement, and delivery characteristics, but they are optional for beginner development.
For youth pitchers, workload belongs in the mechanics conversation because movement quality should not be evaluated without considering how much the player has thrown and whether fatigue is appearing. MLB’s Pitch Smart resources organize pitching-development material around workload management, a responsible foundation for velocity, and healthy habits.
For game pitchers ages 9–12 only, the official daily maximums and rest requirements are:
| Age | Daily game maximum | Pitches thrown | Required rest |
|---|---|---|---|
| 9–10 | 75 | 1–20 / 21–35 / 36–50 / 51–65 / 66–75 | 0 / 1 / 2 / 3 / 4 days |
| 11–12 | 85 | 1–20 / 21–35 / 36–50 / 51–65 / 66–85 | 0 / 1 / 2 / 3 / 4 days |
The same MLB guidelines for pitchers ages 9–12 recommend proper warm-ups, fatigue monitoring, no pitching in multiple games on the same day, no pitching on three consecutive days, and at least four months away from throwing each year, including two to three continuous months.
These limits apply specifically to pitchers ages 9–12 and game pitch totals. They should not be automatically extended to other ages, ordinary position-player throwing, or every practice throw. Consult the official guidance for the player’s actual age and role.
This article cannot evaluate pain, persistent discomfort, or a player who changes the motion to protect the arm. As a general precaution, end the mechanics session rather than trying to solve those concerns with drills, and seek individualized observation from an appropriate coach or medical professional.
Start with a comfortable four-seam grip, then practice balance and direction at low intensity. Progress from release work to upper-body drills, stationary throws, and complete throws. Track accuracy and repeatability, adding distance or speed only while movement quality holds. Pitchers need specialized instruction beyond these foundations, and workload remains part of development rather than a separate concern.
Should beginners use a four-seam grip?
Usually, yes—as a starting point. It offers clear finger-placement landmarks and makes rotation easier to observe during practice. It is not mandatory for every athlete or every throw. Comfort, hand size, pitch type, position, and the play may justify an adjustment.
How should a player with small hands hold a baseball?
Keep the thumb underneath and place the index and middle fingers across the seams as comfortably as possible. Do not force wide finger spacing or a large gap between the ball and palm. Adjust the spacing until the player has secure, comfortable control. The cited three-finger example applies to a softball, not as a universal prescription for small-handed baseball players.
Does a compact arm path prevent injury?
That claim is not established. A compact arm path can be a useful coaching convention for beginners, catchers, or quick infield throws, but it does not guarantee safety. Arm action changes with anatomy, position, distance, and intent. A player experiencing pain or persistent discomfort needs individual observation rather than a forced compact motion.