
Curveball Grip: Finger Placement, Pressure, and Simple Fixes
Set a basic curveball grip, check finger pressure, compare a standard and spike grip, and make small adjustments without forcing the pitch.
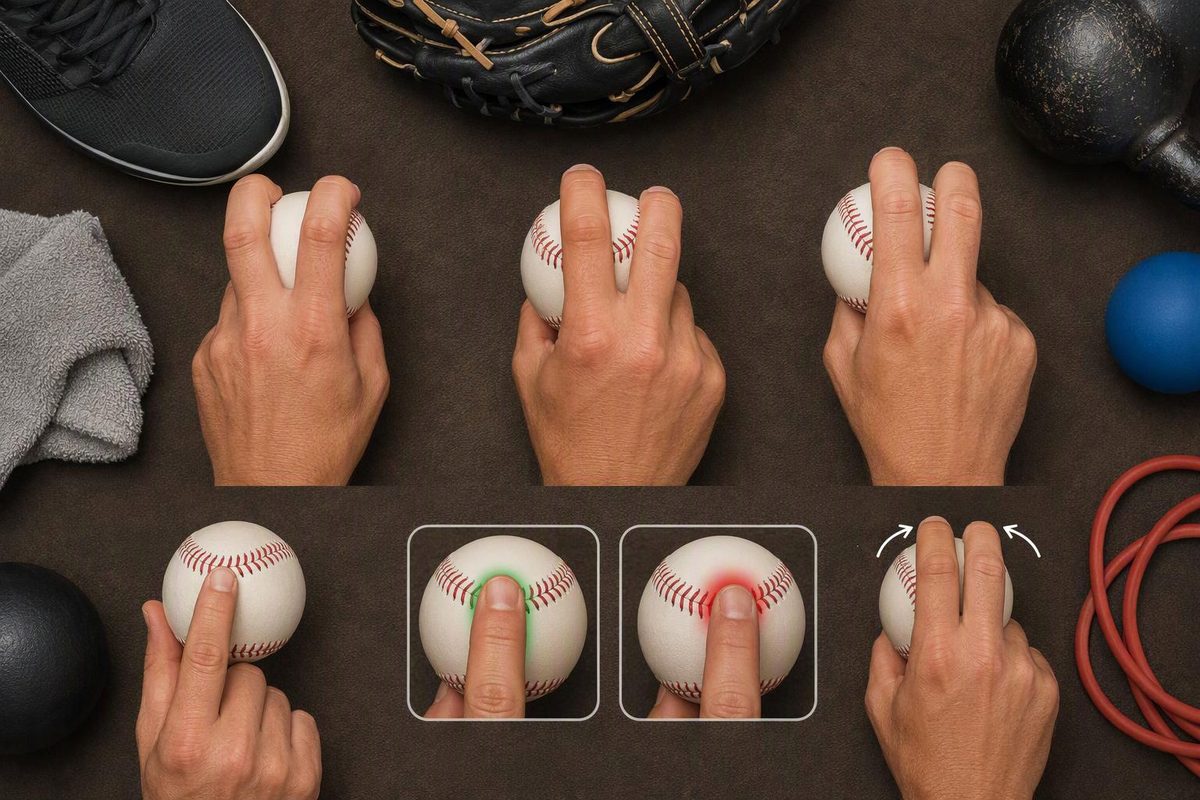
Start a basic curveball grip with the middle finger along a seam, the index finger beside it, and the thumb underneath. Hold the ball firmly enough that it does not slip, but not so tightly that the fingers or forearm tense.
This is a starting point, not the only workable grip. MLB pitchers use standard and spike variations with different index-finger, thumb, and grip-depth choices. In the examples described by MLB, the consistent feature is a middle finger running along a seam (MLB). Comfort and repeatability matter more than copying one pitcher’s exact hand position.
How to set the grip
- Find the horseshoe-shaped seam. Turn the ball so the open part of the horseshoe faces into the palm.
- Place the middle finger along a long seam. Let the pad of the finger sit beside or partly on the raised seam. This is the main contact point for the grip.
- Rest the index finger beside it. Keep this finger relaxed. Do not bend or “spike” it yet.
- Put the thumb underneath. Begin with the thumb roughly opposite the middle finger, on or near a seam.
- Choose a comfortable grip depth. Start with a little space between the ball and palm. If the ball feels unstable, move it slightly deeper rather than squeezing harder.
- Apply only enough pressure to secure the ball. Favor the middle-finger contact slightly while using the thumb for support, not a hard pinch.
Checkpoint: With the hand relaxed and facing down, the ball should stay in place without white fingernails, a rigid wrist, or noticeable forearm tension. Hand size, finger length, and the height of the seams affect the fit, so do not force an uncomfortable position.
Use one simple release cue
Keep the delivery moving rather than slowing the arm to guide the pitch. A useful cue is “middle finger over the front of the ball.” Let the ball leave from that finger and allow the throwing hand to finish in front of the body.
Do not try to manufacture a bigger break by violently twisting or wrenching the wrist. If a pitcher cannot repeat the release without changing the rest of the delivery, return to the fastball and work with a qualified coach before adding more curveballs.
For release instruction and a step-by-step throwing progression, see how to throw a curveball.
Make one adjustment at a time
First check the grip without throwing. For an age-appropriate pitcher who already has fastball and changeup command, test only a few coach-supervised throws and change one variable between sets.
- The ball slips early: Move the thumb closer to the point opposite the middle finger, place a little more of the middle-finger pad against the seam, or hold the ball slightly deeper. Test one change—not all three.
- The ball has weak or inconsistent spin: Check whether the middle finger stayed connected to the seam. Do not answer poor spin by squeezing harder or forcing the wrist.
- The ball repeatedly pops upward: Return to an easy throw and check whether the hand is getting under or around the ball instead of finishing over the front.
- The pitch repeatedly bounces: Check for an early release, excess grip pressure, or a delivery that slows down before simply aiming higher.
- The arm visibly slows: The pitcher may be guiding the ball. Return to a comfortable fastball or changeup rather than forcing more curveballs.
- The grip or throw hurts: Stop. Firm seam pressure against a finger is different from pain in the finger, wrist, elbow, or shoulder.
Video can help with one simple comparison, such as whether the pitcher’s tempo changes between a fastball and curveball. Record from a protected position behind a fence or backstop, and review only one cue at a time.
Standard grip or spike grip?
Begin with the standard setup: index and middle fingers next to each other. A spike curveball grip bends the index finger so its tip, nail, or knuckle contacts the ball. MLB’s examples show that pitchers spike the finger to different degrees; other pitchers keep the index finger beside the middle finger (MLB).
A spike grip is not automatically better. It can feel cramped, especially in a smaller hand. Try it only if the standard grip is comfortable but the index finger seems to interfere with a clean release. Never force the finger into a sharply bent position.
Whether testing a spike grip or the standard version, change only one of these at a time:
- thumb position;
- grip depth;
- index-finger contact; or
- middle-finger seam placement.
Keep the version that gives the best combination of comfort, repeatable spin, and target control—not simply the largest break.
Age, workload, and pain set the boundaries
For ages 9–12, MLB Pitch Smart advises avoiding pitches other than fastballs and changeups. For ages 13–14, its guidance says players can begin using breaking pitches after developing a consistent fastball and changeup (Pitch Smart ages 9–12; Pitch Smart ages 13–14). Younger pitchers can keep building their foundation with the four-seam fastball grip.
A laboratory study of 33 experienced adolescent pitchers found lower measured shoulder and elbow moments on curveballs than on fastballs, but the authors called for further study; that finding does not establish that curveballs are injury-proof (MLB research summary). The American Sports Medicine Institute identifies overuse as the principal injury risk and warns that some developing pitchers may lack the physical development, control, or instruction needed to throw a curveball with good mechanics (ASMI).
Count every curveball within the pitcher’s normal workload and follow the applicable league’s pitch-count and rest rules. Stop when accuracy, velocity, or mechanics deteriorate. Elbow or shoulder pain means no more throwing until the pitcher has been evaluated by a sports-medicine professional.