
How to Build a Repeatable Sinker Grip That Fits Your Hand
Start with index and middle fingers along—or just inside—the two closest seams, thumb underneath, and use a fastball-like delivery.
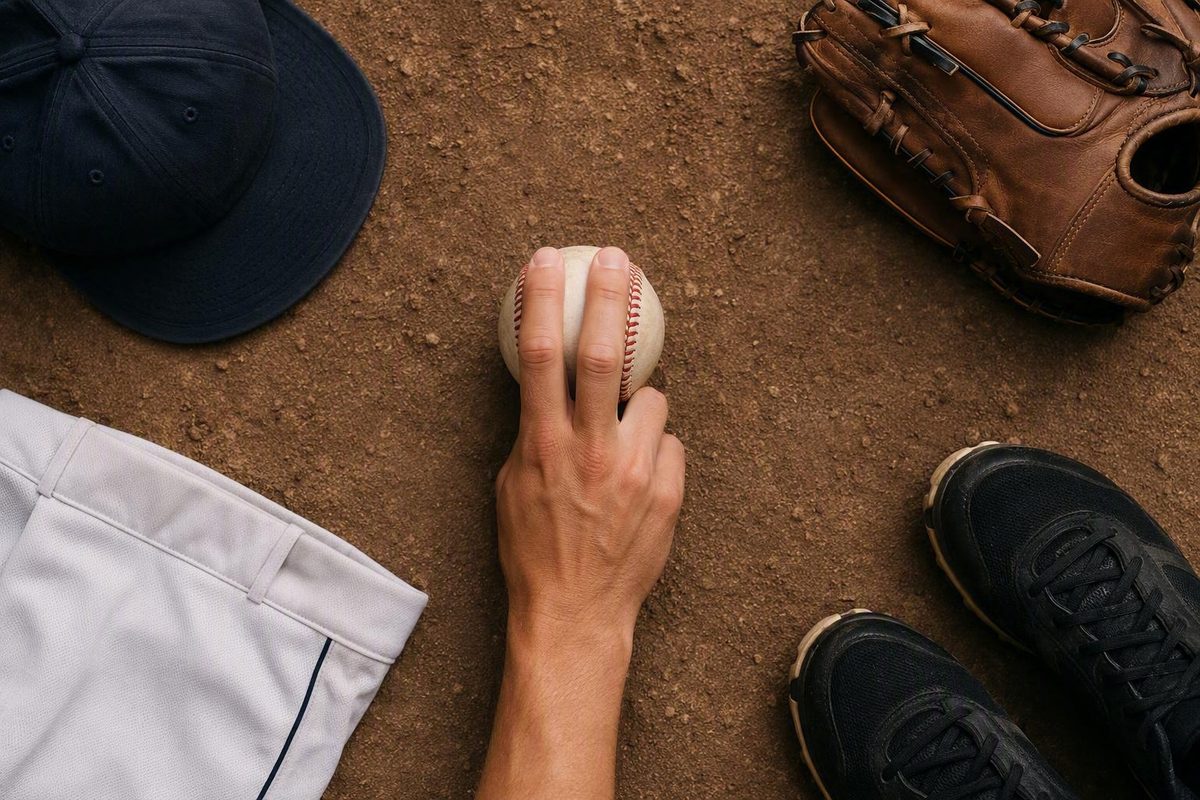
The grip of a sinker is a starting point, not a promise. Begin with the common two-seam orientation: index and middle fingers along—or slightly inside—the two closest seams, thumb underneath, and the other fingers relaxed against the side. Throw it with a normal fastball-like delivery before testing small changes.
That baseline may produce downward action, arm-side run, or both. It may also produce an ordinary two-seam fastball. The useful question is not whether the grip resembles a professional pitcher’s grip. It is whether the position is comfortable, easy to find, consistently commanded, and capable of producing useful movement without forced wrist action.
What a sinker is supposed to do
A sinker is a fastball associated with downward action, arm-side movement, or both. “Arm side” means that the ball moves toward the pitcher’s throwing-arm side:
- For a right-handed pitcher, arm-side movement goes to the pitcher’s right.
- For a left-handed pitcher, arm-side movement goes to the pitcher’s left.
Those directions are reversed from the catcher’s perspective. Describing movement relative to the pitcher is therefore clearer than saying every sinker moves left or right.
Compared with a four-seam fastball, a sinker is generally expected to show more arm-side movement, more downward action relative to that pitcher’s straighter fastball, or some combination of the two. It may be somewhat slower than the pitcher’s four-seamer, but no fixed velocity gap defines the pitch. MLB describes a sinker as a fastball with downward or arm-side movement and notes that it is also commonly called a two-seam fastball (MLB’s sinker definition).
The terminology becomes less consistent when pitchers distinguish a sinker from a two-seamer:
- A pitch with noticeable downward action is often called a sinker.
- A pitch that moves predominantly sideways toward the arm side is often called a two-seamer or running fastball.
- A pitch that does both may receive either name.
These are practical descriptions, not universally accepted classifications. Interviews with pitchers and coaches show substantial agreement that the grips overlap, but disagreement about whether movement, execution, or terminology makes the pitches meaningfully different (FanGraphs’ survey of sinker and two-seam terminology).
A sinker begins from a different seam orientation and may involve asymmetrical pressure or a slightly offset grip. It should still be thrown with fastball-like intent rather than by slowing the arm to make the ball drop.
The central limitation is simple: a grip creates a starting condition, but it does not guarantee a movement profile. Finger pressure, seam orientation, thumb position, grip depth, release, arm slot, velocity, mechanics, and individual anatomy can all influence the result. The ball’s repeatable behavior—not the grip’s name—should determine whether the pitch is functioning as a sinker.
The baseline sinker grip, finger by finger
Rotate the baseball until the two closest seams appear to run vertically in front of you and the horseshoe-shaped seam is upright. This is the common orientation used to explain a sinker or two-seam fastball.
Build the grip one finger at a time:
-
Index finger: Place the index finger lengthwise along one of the two narrow seams. The fingertip should have a clear, comfortable reference point. If direct seam contact feels awkward, move the finger just inside the seam rather than stretching or twisting the hand.
-
Middle finger: Place the middle finger along the other narrow seam. Moving it slightly inside the seam is also reasonable. The index and middle fingers do not have to make perfectly identical contact if differences in finger length make that uncomfortable.
-
Thumb: Set the thumb beneath the ball as a stable counterpoint to the fingers on top. It should support the baseball without forcing the hand into an artificial shape. No supplied evidence establishes one exact seam segment that every pitcher’s thumb must touch.
-
Ring finger: Rest or lightly tuck the ring finger against the side of the ball. It should not strain to reach a prescribed spot.
-
Pinky: Let the pinky rest naturally beside the ring finger. It is not a primary pressure finger for this pitch.
MLB’s common version places the two primary fingers over the area where the seams are closest, with one finger running along each seam. Other instructional guides place those fingers slightly inside the seams. Together, those descriptions support a practical range rather than one mandatory position.
Do not impose a universal palm gap, grip depth, finger spacing, or tightness. Hand size, finger dimensions, dexterity, grip depth, pressure, and comfort can all affect how a pitcher holds the ball (RPP Baseball’s broader pitch-grip guide).
The grip should be secure enough that the ball does not slip prematurely but relaxed enough that the pitcher is not rigidly squeezing it. Because “firm” and “loose” are relative, compare the sinker grip with the pitcher’s ordinary fastball grip rather than assigning an arbitrary level of tightness.
The following diagrams are simplified orientation guides rather than measurements. Exact grip depth and finger spacing should follow the pitcher’s hand.
Top view: right-handed pitcher
                 Upright horseshoe
                       ∩
             Index    │ │    Middle
                       │ │
                two closest seams
Top view: left-handed pitcher
                 Upright horseshoe
                       ∩
            Middle    │ │    Index
                       │ │
                two closest seams
The left-handed view is mirrored for clarity. The underlying instruction does not change: the index and middle fingers occupy the two narrow-seam positions.
Side view
             Index and middle fingers
                      ______
                   .-'      '-.
/ \
                 |   baseball   |  ← ring finger and pinky
/ rest comfortably at side
                   '-.______.-'
                        ↑
                  natural grip depth
Bottom view
                    baseball
                 .------------.
/ \
/
                 '------------'
                       ↑
                     thumb
              stable support underneath
Use the diagrams to identify the seam orientation and each finger’s general role, not to prescribe a fixed palm gap or exact thumb landmark.
Once the ball is set, confirm that the pitcher can find the grip quickly and repeatedly.
On the seams, inside the seams, or offset?
The seam-aligned setup is the clearest baseline because it provides two obvious tactile landmarks. It is not the only viable grip. Three configurations are especially useful for controlled experimentation:
| Configuration | Finger placement | Practical reason to try it | What not to assume |
|---|---|---|---|
| Along the seams | Index along one narrow seam and middle finger along the other | Provides clear tactile references and is easy to define consistently | Direct seam contact does not guarantee more sink |
| Just inside the seams | Both fingers move slightly toward the smooth leather between the narrow seams | May fit some hands more naturally and is commonly taught as a two-seam setup | Smooth-leather contact does not automatically create more run or less spin |
| Slightly offset | The ball shifts so the fingers are no longer centered symmetrically | Creates a different seam relationship without requiring a different delivery | No optimal offset distance or predictable movement gain has been established |
Along the seams
For the seam-aligned version, let each primary finger follow one narrow seam. The main practical benefit is tactile clarity: the pitcher can feel whether the fingers have returned to the same position.
Keep the ball centered at first. Throw it with regular fastball intent and observe the result. If the pitch already produces useful sink or run while preserving command, there is no need to make the grip more complicated.
Just inside the seams
For the inside-seam version, slide the index and middle fingers slightly toward the smooth leather between the narrow seams. Keep the thumb and delivery unchanged during the initial comparison so seam contact remains the only deliberate variable.
This setup may be more comfortable for a pitcher whose fingers do not naturally follow both seams. It should not be presented as automatically better or more capable of producing movement.
A commercial instructional guide describes placing the fingertips on smooth leather rather than directly on the seams. Because that differs from MLB’s seam-aligned description, treat it as an alternative experiment rather than a mandatory rule (JustGloves’ comparison of four-seam and two-seam grips).
Slightly offset
To test an offset grip, shift the ball slightly so the primary fingers are no longer perfectly centered over the narrow-seam area. Leave the rest of the delivery alone.
RPP Baseball describes an offset as a way to give a finger a seam to pull against. Dustin May has described offsetting a previously centered sinker grip with the intention of changing its seam action. These are practitioner descriptions of intent and feel, not proof that an offset will produce a particular movement for another pitcher.
No supplied evidence establishes an ideal offset distance. “Slightly” should mean only enough to create a distinct, repeatable comparison without stretching the fingers or forcing the wrist. If the new position cannot be found consistently, it is too complicated to serve as a useful variation.
More unusual configurations—including tilted one-seam versions, tucked-thumb arrangements, and cutter-influenced grips—have been used by experienced pitchers. They illustrate individual problem-solving, but they are not additional starting grips that every developing pitcher needs to test. Establish a comfortable baseline before exploring advanced variations.
Finger pressure and release: use cues, not guarantees
Finger pressure can affect how the ball leaves the hand, but the available instructional sources do not establish one universal pressure distribution between the index and middle fingers.
Common practitioner cues include:
- Applying somewhat greater pressure with the index finger
- Letting the index finger lead a subtle swipe through release
- Feeling pressure along the inside edge of the ball
- Pulling the fingers through the side of the baseball
These cues overlap, but they are not interchangeable formulas. Test one at a time while preserving the grip, target, and delivery. If index-finger pressure is being evaluated, do not simultaneously offset the ball and move the thumb.
RPP Baseball presents increased index pressure, an index-led swipe, and a more horizontal finger-exit feel as possible sinker or two-seam cues while acknowledging that throwing cues are not one-size-fits-all (RPP Baseball’s sinker grip and cue variations).
Begin with normal fastball-like intent and arm speed. Do not slow the arm to help the ball drop, and do not guide the hand toward an imagined movement path. The first goal is to discover what the grip does when paired with the pitcher’s ordinary delivery.
A cue such as “pull through the side” may help a pitcher identify a useful feel, but it does not require a visible hook or forced wrist turn.
Successful pitchers can create sink without deliberately manipulating or pronating the wrist. Zach Britton, for example, said he did not intentionally pronate or manipulate his sinker, despite using an unusual cutter-influenced grip (FanGraphs’ examination of three sinker grips).
Some instruction describes deliberate pronation as an optional method. In that description, the throwing hand turns farther toward the arm side around release. The same source associates the method with less predictable command and does not establish it as necessary. It should therefore not be the starting point, and pitchers should not force a wrist position in pursuit of movement.
Handedness does not change that instruction. Arm-side movement is mirrored for right- and left-handed pitchers, but neither should force the hand toward the side where the ball is expected to move. Throw through the target with fastball-like intent and let the tested grip and natural release reveal the result.
Avoid treating friction, reduced spin, a specific spin axis, or seam-shifted wake as a proven explanation for what one grip change will do. The supplied evidence does not experimentally isolate those mechanisms from pressure, release, anatomy, and delivery. The practical question is more useful: Can the pitcher reproduce this grip and release while throwing toward the intended location?
Why the same grip can become a sinker or a two-seamer
A sinker and a two-seam fastball often begin with essentially the same grip. MLB commonly refers to a sinker as a two-seam fastball, and many pitchers and coaches describe the grips as basically or exactly the same.
The practical distinction usually appears after release:
- Substantial downward action is often labeled sink.
- Predominantly lateral arm-side movement is often labeled run.
- A pitch that shows both may be called either a sinker or a two-seamer.
There is no universal movement threshold at which a two-seamer officially becomes a sinker.
Practitioners identify several variables that may change the outcome even when the basic grip remains similar:
- Hand position at release
- Finger pressure
- Seam orientation
- Thumb placement
- Grip depth
- Arm angle or arm slot
- Finish through the ball
- Overall mechanics
- Velocity
- Individual hand and finger anatomy
These variables interact. An offset that feels slight to one pitcher may be difficult for another pitcher with shorter fingers.
That is why copying a visible grip without accounting for the hand holding it can be misleading. Name the pitch after observing what it repeatedly does. If a two-seam orientation produces mostly arm-side run, calling it a two-seamer is reasonable. If the same general grip produces clear downward action, sinker may be the more descriptive label. Neither name makes the pitch inherently better.
Do not turn one training provider’s preferred horizontal- or vertical-movement values into universal standards. Tracking systems, handedness, arm slots, velocity, and the pitcher’s existing fastball all affect how movement data should be interpreted. A useful sinker fits the pitcher’s arsenal and can be commanded; it does not merely reach an isolated movement target.
Choose a variation that fits your hand and delivery
Professional pitchers have succeeded with materially different sinker configurations. That does not prove that every variation is equally suitable. It demonstrates that no single hand position must be copied by every pitcher.
Three examples illustrate that range:
- Zach Britton described a cutter-influenced grip and said he did not intentionally pronate or manipulate the pitch.
- Sam Dyson described a more conventional sinker grip with the thumb tucked underneath.
- Blake Treinen described tilting a normal sinker grip into something resembling a one-seam orientation.
Treinen also connected the way the ball fit his hand to limited thumb mobility from an old injury. His grip was therefore partly an accommodation to his anatomy, not simply a creative preference. The same report warns that these elite pitchers’ grips do not guarantee comparable results for somebody else (FanGraphs’ documented grip comparisons).
Dustin May offers another example of individual adjustment. In a public demonstration, he said he had moved from a centered, straight-up-and-down sinker grip to a slightly offset version. The verbal explanation does not map every fingertip to a specific seam clearly enough for exact replication, so the useful lesson is his process: he made a small change to an established grip rather than assuming the first configuration was permanent (Dustin May’s grip demonstration).
That makes thumb position a legitimate experimental variable, not proof of a rule such as “move the thumb here for more sink” (FanGraphs’ interview collection).
Evaluate the resulting pitch rather than attributing every change to the thumb alone.
Some coaching instruction attempts to match grips to arm slots—for example, suggesting that a more over-the-top thrower try a tilted grip or that a lower-slot pitcher experiment with thumb position. This is a hypothesis to test, not a validated selection rule. Arm slot alone cannot determine which grip will work.
Use four questions to evaluate fit:
- Comfort: Can the pitcher hold the ball without stretching, excessive squeezing, or an intentionally forced wrist position?
- Command: Can the pitcher throw toward an intended location?
- Repeatability: Can the pitcher find and release the same grip consistently?
- Movement: Does the pitch produce a useful pattern often enough to matter?
A professional pitcher’s grip can provide an idea, but it should not outrank those four answers. The best grip for a developing pitcher is usually the simplest comfortable variation that produces repeatable, usable results.
A controlled way to test sinker grips
Grip development becomes confusing when several changes are made at once. If a pitcher offsets the ball, moves the thumb, adds index pressure, and changes the wrist action in the same session, there is no clear way to identify what produced the result.
Use a controlled process instead.
1. Establish the baseline
Begin with:
- Horseshoe upright
- Two closest seams running vertically
- Index and middle fingers along the seams or in the nearest comfortable inside-seam position
- Thumb beneath the ball
- Ring finger and pinky relaxed
- Normal fastball-like delivery
Record how the pitch feels, where it goes, and what movement appears repeatedly. Do not judge the grip from one dramatic throw.
2. Select one variable
Choose one change:
- Move from on-seam to just inside the seams.
- Shift the ball slightly off center.
- Adjust the thumb while preserving the top-finger position.
- Test one finger-pressure or release cue.
- Return from an altered setup to the centered baseline.
Small changes are easier to evaluate and reverse.
3. Keep the comparison fair
Throw the baseline and variation under comparable conditions. Use similar intent, the same target, and a similar throwing context.
Do not compare low-effort catch play with high-effort mound work and attribute every difference to the grip. If the baseline is tested while fresh and the variation only after command has deteriorated, the results will be difficult to interpret.
4. Record more than movement
For each grip, note:
- Strikes or successful target-area throws
- Intended-location misses
- Common miss direction
- Comfort in the fingers, thumb, hand, and wrist
- Ease of finding the grip
- Repeatability of movement
- Perceived effort
- Velocity, if reliable measurement is available
- Horizontal and vertical movement, if reliable tracking is available
A phone note, bullpen chart, or paper grid is sufficient. The purpose is to prevent one memorable pitch from outweighing the broader pattern.
5. Evaluate the complete trade-off
A variation that adds movement but produces frequent noncompetitive misses may not be an improvement. Nor is a grip necessarily better if it moves more while losing useful velocity, becoming uncomfortable, or taking too long to find.
Judge the complete package:
movement + command + velocity + comfort + repeatability
The balance will differ by pitcher. One may accept slightly less movement for substantially better command. Another may find an offset that adds useful action without a meaningful cost. No universal acceptable velocity loss or movement threshold is established by the supplied evidence.
6. Use a repeatable landmark
The seams provide the most obvious grip landmarks. The printed logo can also help a pitcher begin from the same orientation each time.
Dustin May has described presetting his grips from the baseball’s logo and prioritizing fingertip alignment before allowing his thumb to settle into place. That is his personal routine, not a requirement. The general lesson is to use a landmark that makes the selected grip easy to reproduce.
7. Revert when necessary
Return to the baseline when an adjustment:
- Makes the grip uncomfortable
- Produces a less predictable release
- Substantially reduces command
- Cannot be found consistently
- Encourages the pitcher to steer the ball
- Creates a worse overall pitch despite one appealing movement trait
Reverting is not failure. It restores a known reference point and makes the next comparison easier to interpret.
Troubleshooting movement, command, and discomfort
When a sinker does not behave as expected, check setup and release repeatability before searching for another grip.
If the pitch stays straight
Determine whether the same grip is being reproduced:
- Is the horseshoe oriented the same way each time?
- Are the fingertips returning to the same seam locations?
- Is the thumb moving between throws?
- Is the ball sitting at a consistent depth?
- Is the same pressure cue being used?
- Is the pitcher maintaining normal fastball intent?
If those elements vary, stabilize the baseline before changing it. A straight result from an inconsistent setup does not reveal whether the underlying grip is effective.
Once the position is repeatable, test one change, such as moving just inside the seams or applying one clear pressure cue.
If the pitch runs arm side but does not sink much
The pitch may simply be functioning as a two-seam fastball. That is not automatically a defect. Arm-side run can be useful if the pitcher commands it and it complements the rest of the arsenal.
If more downward action is desired, test one small variable: seam contact, slight offset, thumb position, or a finger-pressure cue. Preserve fastball intent rather than forcing wrist rotation.
Let repeated ball flight determine whether the adjustment works. If the original version has better command and useful run, retaining it as a two-seamer may be the better choice.
If the pitch unexpectedly moves glove side
Treat unexpected glove-side action as a diagnostic problem rather than evidence of one certain cause.
Review:
- Whether the ball has rotated into a different seam orientation
- Whether finger pressure has shifted unintentionally
- Whether the offset has become larger
- Whether the release remains consistent
- Whether the pitcher is steering or deliberately manipulating the wrist
Return to the centered baseline and compare. If the glove-side movement disappears, reintroduce the latest adjustment by itself. If it remains, a qualified coach who can observe the delivery may be able to identify a pattern that written instructions cannot show.
If command deteriorates
Return to the most comfortable baseline grip and remove recent adjustments one at a time. Confirm that the pitcher can throw the baseline toward the intended location before experimenting again.
Do not value one dramatic bullpen pitch over strike-throwing ability. Movement without command or repeatability is not automatically an improvement.
Also compare grip pressure with the pitcher’s ordinary fastball pressure. If the pitcher is deliberately squeezing harder in an attempt to create movement, remove that change and reassess before trying another cue.
If the grip causes discomfort
End the grip experiment if it produces wrist, elbow, or shoulder discomfort. Written instruction cannot determine the cause of physical symptoms or account for an individual pitcher’s anatomy, mechanics, workload, or health history.
A qualified coach can directly observe whether the grip or delivery is being forced. Pitcher’s Helmet likewise states that its educational material does not replace a coach or doctor who can assess the individual pitcher (Pitcher’s Helmet’s scope disclaimer).
Frequently asked questions
Is a sinker grip the same as a two-seam fastball grip?
Often, yes. The common sinker grip uses the same narrow two-seam orientation associated with a two-seam fastball, and many pitchers and coaches describe the grips as essentially the same.
The distinction is usually based on the result. A pitch with greater downward action is often called a sinker, while one with predominantly lateral arm-side run is often called a two-seamer. There is no universal naming threshold, so a two-seam grip does not automatically make the pitch a sinker.
Should the index and middle fingers sit on the seams or inside them?
Either is a reasonable starting configuration. Placing one finger along each narrow seam creates a strong tactile reference. Moving the fingers just inside the seams is another commonly taught setup and may fit some hands more comfortably.
Test the positions while keeping the thumb, delivery, target, and intent as constant as possible. Choose according to comfort, command, and repeatable movement—not an assumption that one type of seam contact must produce more sink.
Which finger should apply more pressure when throwing a sinker?
There is no universal pressure distribution. Some instructors cue greater index-finger pressure or an index-led swipe; others emphasize inside-edge pressure or pulling the fingers through the side of the ball.
Begin with comfortable, fastball-like pressure. Test one cue at a time and retain it only if it improves the overall combination of movement, command, comfort, and repeatability. More index pressure is an experiment, not a guarantee of more sink.
Do pitchers need to pronate the wrist to make a sinker drop?
No. Effective sinkers can be thrown without intentional pronation or wrist manipulation.
Some instruction presents additional pronation as an optional method, but it is not required and has also been associated with less predictable command. Begin with a normal fastball-like delivery and do not force the wrist into a position to manufacture drop.
Why does my sinker run sideways without sinking?
It may be behaving like a two-seam fastball. Because sinkers and two-seamers often share a grip, predominantly lateral arm-side run is a plausible result.
First confirm that the seam orientation, fingertip placement, thumb position, grip depth, and pressure cue are being repeated. If they are, test one small adjustment without forcing wrist rotation. If the running version is comfortable, repeatable, and commandable, it may already be a useful pitch even if “two-seamer” is the more descriptive name.
The common two-seam orientation remains the best baseline. The best working grip, however, is the variation a pitcher can hold comfortably, command consistently, and reproduce without forced wrist action. Change one variable at a time, judge the complete result, and let repeated ball flight determine whether the pitch behaves more like a sinker or a running two-seamer.