
How to Build a Comfortable, Repeatable Two-Seam Fastball
Set two fingers along the narrow seams and the thumb underneath, then adjust seam contact, grip depth, and pressure one variable at a time.
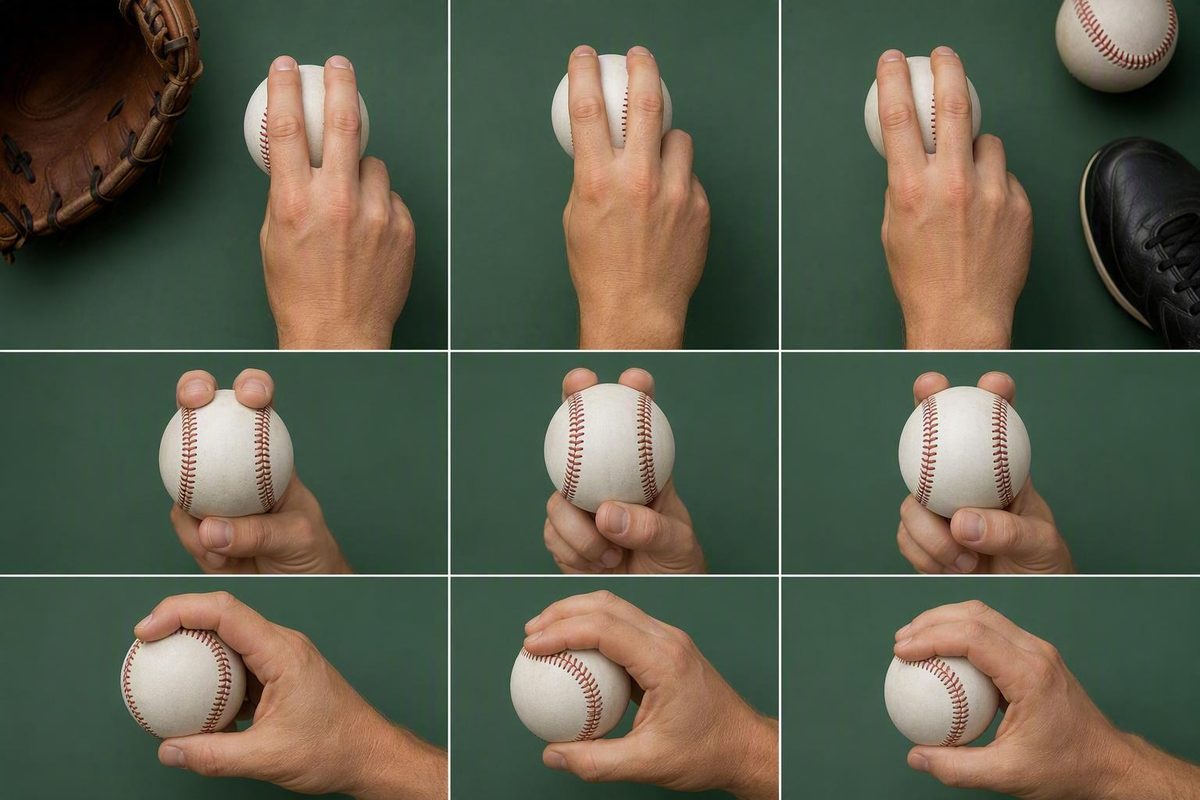
A reliable grip for a 2 seam fastball begins with a neutral setup: orient the baseball so the two narrow, closely spaced seams run beneath the index and middle fingers, place the thumb underneath for balance, relax the remaining fingers along the side, and use a normal fastball delivery.
From there, adjust seam placement, finger spacing, grip depth, and pressure one variable at a time. The goal is not to copy one photograph perfectly or force dramatic movement. It is to find a grip that feels comfortable, produces strikes, and creates a useful flight path that differs from the pitcher’s four-seam fastball.
The baseline two-seam fastball grip
Start here:
- Rotate the baseball until you find the two narrow, closely spaced seams.
- Place the index and middle fingers along those seams rather than across several seams.
- Begin with the finger pads directly on the seams or immediately inside them.
- Put the thumb beneath the ball, approximately opposite the space between the top fingers.
- Rest the ring finger and pinky loosely along the side.
- Hold the ball securely without squeezing harder than necessary.
- Throw it with the same comfortable arm action used for a regular fastball.
The grip should be simple enough to reproduce without searching for it in the glove.
Find the narrow seams. Rotate the baseball until the curved horseshoe patterns face one another and the space between the two long seams is relatively narrow. The index and middle fingers should follow those seams lengthwise. Driveline similarly begins by aligning those fingers with the baseball’s two closest seams while noting that the exact grip varies with the pitcher (Driveline’s two-seam grip guide).
Place the index and middle fingers. Use the pads rather than trying to balance the baseball on the extreme fingertips. Keep the fingers comfortably close and pointed in the same general direction as the narrow seams.
Two starting positions are well represented in the supplied instructional material:
- On the seams: Each finger pad rests directly on a narrow seam.
- Just inside the seams: The pads contact the smooth leather between the seams while remaining aligned with them.
Neither position is a universal requirement. Begin with the one that feels easier to find and hold, then compare it with the other during controlled practice.
Place the thumb. Set the thumb beneath the baseball to support and balance it. A practical neutral position is approximately below the space between the index and middle fingers. Other published grips place the thumb closer to the index-finger side or against the lower seam. A small shift is reasonable when it improves balance without forcing the hand into an awkward position.
Place the supporting fingers. Let the ring finger rest lightly along the side of the ball. The pinky can remain beside it or curl naturally out of the way.
Set grip pressure. Hold the baseball firmly enough that it remains stable during the delivery, but not so tightly that the hand and forearm become rigid. Published instructions range from loose-but-secure pressure to pressure slightly firmer than a four-seam grip. That variation is a reason not to prescribe one universal setting. Start with the lightest pressure that provides a stable, confident hold.
Original grip visuals
Figure 1 — Top view: narrow-seam orientation
Alt text: Top view of a baseball with the index and middle fingers running lengthwise along the two closest seams.
text
                 FINGER PADS
            INDEX         MIDDLE
               ↓             ↓
         .-----------------------.
/ ║ ║ \
      |        ║   narrow    ║      |
      |        ║    space    ║      |
║ ║ /
         '-----------------------'
                ↑             ↑
           narrow seam   narrow seam
The finger pads run along the narrow seams. They may begin directly on the stitching or immediately inside it.
Figure 2 — Side view: ring finger and optional palm gap
Alt text: Side view showing the index and middle fingers above the ball, the ring finger resting against its side, and an optional small space between the ball and palm.
text
                index and middle fingers
                         ______
                      .-'      '-.
/ \
                    |     BALL     | ← ring finger
/
                      '----------'
                           ↕
                 optional small space
                           ↕
                          PALM
The ring finger rests lightly against the side. A small palm gap can be tested, but it is not mandatory.
Figure 3 — Underside view: neutral thumb position
Alt text: Underside view of a baseball showing the thumb centered approximately beneath the space between the index and middle fingers.
text
            index side         middle side
/
                  .---------------.
/ \
               |        BALL         |
/
                  '---------------'
                          ↑
                        THUMB
                neutral starting point
Begin with the thumb approximately centered underneath. A slight shift toward the index finger or lower seam is an available adjustment.
Before throwing, check three things: the ball is stable, the hand is relaxed, and the grip can be found quickly. If the fingers must stretch or the ball feels insecure, adjust the spacing or depth rather than forcing the diagram to fit the hand.
Adjust the grip for hand size, comfort, and control
The baseball stays the same size, but pitchers’ hands do not. Grip depth and finger spacing should therefore follow the individual hand rather than a fixed photograph or measurement.
A shallow hold leaves a little space between the baseball and the palm.
A marginally deeper hold brings the baseball slightly closer to the palm.
Neither position is inherently better. A deeper hold may change release feel, movement, command, or velocity differently for each pitcher. It should not be treated as an automatic way to create sink.
Keep the index and middle fingers comfortably close. If direct seam contact requires an awkward stretch, try one of three small adjustments:
- Move the fingers just inside the seams.
- Rotate the baseball slightly.
- Let the ball sit marginally deeper in the hand.
Treat the setup as four separate variables:
- Seam position: On the seams, just inside them, or slightly offset
- Finger spacing: Close enough to remain comfortable and wide enough to stabilize the ball
- Grip depth: A shallow hold with some palm space or a marginally deeper hold
- Pressure: Secure without an unnecessary squeeze
Change only one variable at a time. If the pitcher moves the fingers, deepens the grip, and changes pressure simultaneously, it becomes difficult to identify which adjustment affected the result.
Hand size is not the only consideration. Finger length, finger strength, dexterity, pressure, grip depth, and comfort can all influence the result, according to RPP Baseball’s discussion of individualized pitch grips (RPP Baseball’s comprehensive grip guide).
Reject or reconsider a grip when it:
- Feels strained before the throw
- Repeatedly slips during normal throwing
- Requires an aggressive squeeze
- Produces persistent discomfort
- Creates a hesitant or unnatural release
- Consistently makes intended targets harder to reach
A new grip may feel unfamiliar at first, but the pitcher should not have to force the hand into position. Because remote instruction cannot assess an individual arm or diagnose discomfort, pain or persistent discomfort should be taken to a qualified coach or healthcare professional who can evaluate the pitcher directly.
Throw it with a normal fastball arm action
Use the pitcher’s normal, comfortable fastball delivery as the baseline. The grip changes; the pitcher does not need to invent a new arm slot, deliberately slow the arm, or manufacture a different wrist action.
In practical terms:
- Use the normal leg lift and stride.
- Maintain the usual comfortable throwing-arm path.
- Throw with normal fastball intent.
- Allow the arm and hand to continue through their natural follow-through.
The ball may leave the fingers with a different seam orientation from a four-seamer, but two-seam instruction generally describes the pitch as being thrown with similar fastball arm action.
Some training guides offer cues involving index-finger pressure, a slight swipe, or pronation. Those are pitcher-specific coaching options rather than guaranteed formulas. RPP Baseball, for example, presents multiple release cues while expressly noting that cues are not one-size-fits-all (RPP Baseball’s sinker and two-seam guide).
For a developing pitcher, first learn what the baseline grip does with the existing delivery. Do not begin by consciously turning the wrist, pulling around the baseball, or changing the arm slot. Those actions are not necessary to test the neutral grip and can obscure whether the grip itself is producing a useful result.
It also helps to distinguish follow-through from manipulation:
- Natural follow-through: The arm and hand continue moving after release as part of the pitcher’s usual delivery.
- Conscious manipulation: The pitcher attempts to create movement by changing the wrist, forearm, or arm path before release.
If a coach later introduces a pressure or release cue, change it subtly and evaluate the result. Keep the cue only if the pitcher remains comfortable, throws intended targets, and gains a useful pitch shape without an unacceptable personal loss of command or velocity.
Prioritize:
- Comfort
- Repeatable mechanics
- Ability to throw intended targets
- A useful difference from the four-seam fastball
- Movement that supports the first four priorities
The objective is a usable fastball, not the most dramatic single throw.
What movement a two-seamer may produce
A two-seam fastball often moves toward the pitcher’s throwing-arm side. This is called arm-side run.
From the pitcher’s perspective:
- A right-handed pitcher’s arm side is to the right.
- A left-handed pitcher’s arm side is to the left.
The pitch may show lateral run, downward action, or a blend of the two. The amount and shape vary among pitchers. Driveline describes arm-side movement and possible downward sink as common two-seam characteristics, while also emphasizing that the grip varies with hand size, comfort, arm angle, and desired movement.
Figure 4 — Mirrored movement paths from the pitcher’s perspective
Alt text: Two diagrams showing a right-handed two-seamer moving toward the pitcher’s right and a left-handed two-seamer moving toward the pitcher’s left, with possible downward action.
Right-handed pitcher Left-handed pitcher Catcher
↗ possible arm-side path
● PitcherCatcher
possible arm-side path ↖
Pitcher ●Arm side: right Arm side: left The diagrams show the pitcher’s view toward home plate. The horizontal direction appears reversed from the catcher’s or hitter’s perspective.
Grip alone does not guarantee movement. Ball flight may change with seam placement, pressure distribution, hand characteristics, release, arm angle, and velocity. Two pitchers can use similar grips and produce different results.
That variability is why a pitcher should judge personal ball flight rather than chase a universal break shape. Ask whether the movement is predictable and whether the pitcher can direct it toward useful locations.
Possible strategic goals include:
- Creating a path distinct from the four-seam fastball
- Moving the ball toward the throwing-arm side
- Producing some downward action
- Seeking weak contact or ground balls when the pitch’s actual shape and location support that plan
These are possible uses, not promised outcomes. A two-seamer does not automatically produce weak contact or ground balls.
Instead of asking only how much the pitch moves, ask:
- Can the pitcher predict the direction?
- Does it begin and finish in useful areas?
- Can the same general movement be repeated?
- Is the path meaningfully different from the four-seamer?
- Does the grip remain comfortable?
Commandable movement is more useful than extra break that the pitcher cannot control.
Two-seam versus four-seam fastball
The clearest grip difference is the direction of the fingers relative to the seams. On a two-seamer, the index and middle fingers generally run along the narrow seams. On a four-seamer, they generally lie across the seams.
| Feature | Two-seam fastball | Four-seam fastball |
|---|---|---|
| Seam orientation | Fingers run along the narrow seams or immediately inside them | Fingers cross the seams |
| Typical ball flight | More likely to show arm-side run, downward action, or both | Generally straighter |
| Grip variability | Commonly adjusted through placement, depth, offset, and pressure | Commonly begins with a more neutral, symmetrical setup |
| Possible velocity relationship | May be slightly slower, depending on the pitcher | Often the pitcher’s firmer fastball |
| Common purpose | Add a moving fastball path | Establish a direct fastball path and foundational command |
These are tendencies, not guarantees. A pitcher may have a running four-seamer, a relatively straight two-seamer, or little useful separation between them.
There is no universal velocity gap that a two-seamer must have. Compare it with the same pitcher’s four-seamer under similar conditions. The practical question is whether any speed difference is justified by useful, controllable movement.
The pitches may complement each other when their actual paths are distinct. A straighter four-seamer and an arm-side-running two-seamer can provide two fastball shapes without requiring two radically different deliveries. If the pitches travel at similar speeds along nearly identical paths, carrying both may offer little practical distinction.
Pitchers who have not established a foundational fastball can first consult Pitcher’s Helmet’s blog listing for its four-seam grip feature.
When comparing the two pitches, use the same target and similar effort. Observe where each pitch starts, the direction it travels, where it finishes, and whether the shape can be repeated. Do not judge the comparison solely by which pitch breaks more.
Grip variations worth testing
The baseline is a starting point, not the only correct configuration. Once it can be reproduced reliably, test variations in a controlled order.
1. On-seam variation
Place both finger pads directly on the narrow seams.
Some pitchers find this secure. Keep the variation only if it remains comfortable and repeatable.
2. Inside-seam variation
Move the finger pads just inside the narrow seams so that they contact more smooth leather while remaining aligned with the stitching.
The supplied instructions genuinely differ on this point: some place the fingers on the narrow seams, while others place them inside or alongside the seams. Treat the disagreement as an experiment rather than trying to declare one universal answer.
3. Offset variation
Rotate or shift the ball slightly so that one finger has more direct contact with or leverage against a seam. Keep the change small enough that the grip still feels like a fastball.
An offset may alter the release feel or ball flight. If it produces unpredictable movement, major command loss, or an awkward release, return to the centered setup.
4. Marginally deeper variation
Move the baseball slightly closer to the palm while keeping the fingers aligned with the same seams. This may help a smaller hand secure the baseball or simply provide a different release feel.
“Deeper” should mean a small, testable change—not burying the baseball in the palm. If the pitch becomes difficult to release or produces an unacceptable personal loss of command or velocity, return to the previous depth.
5. Index-pressure variation
Begin with approximately even pressure. If a coach wants to test a slight index-finger bias, change only that variable and leave the delivery alone.
Extra index pressure is a coaching cue, not a reliable formula for run or sink. It may change the result for one pitcher, do little for another, or create an unwanted shape for a third.
Resolve grip disagreements through testing
Use the following process to compare on-seam and inside-seam placement:
- Choose one position as the baseline.
- Decide in advance how many comfortable throws will make up each comparison group.
- Use the same target and similar effort.
- Record comfort, target result, observed movement, and velocity when available.
- Move only the finger pads to the alternative position.
- Repeat the same-size group under similar conditions.
- Keep, reject, or refine the change.
- Confirm the result on another day before treating it as permanent.
A simple record can use these columns:
| Grip version | Comfort | Intended target | Actual result | Movement observed | Velocity, if available |
|---|---|---|---|---|---|
| On seam | |||||
| Inside seam |
This is a practical comparison, not a claim of scientific certainty. Its purpose is to prevent several simultaneous changes from making the result impossible to interpret.
Discontinue any variation that causes pain, persistent discomfort, major command loss, repeated slipping, or an unnatural release. Pitcher’s Helmet provides informational guidance and does not replace direct evaluation by a coach or doctor who can observe the individual pitcher (Pitcher’s Helmet’s scope and disclaimer).
A controlled practice and troubleshooting routine
Grip testing works best when it resembles a simple experiment.
Use this routine during catch play or an appropriately paced bullpen:
- Establish the baseline. Put two fingers along the narrow seams, the thumb underneath, and the supporting fingers loosely along the side.
- Choose a fixed comparison group. Decide in advance how many comfortable throws will be used for each version.
- Throw at comfortable effort. Do not begin by chasing maximum velocity or movement.
- Record the result. Note comfort, intended target, actual location, ball flight, and velocity when available.
- Change one variable. Adjust seam placement, grip depth, or pressure—not several at once.
- Repeat the same-size group.
- Compare the groups.
- Confirm the preferred version on another day.
Track five practical criteria:
| Criterion | Question |
|---|---|
| Comfort | Can the pitcher hold and throw the grip without strain or persistent discomfort? |
| Command | Can the pitcher hit or closely approach intended targets? |
| Velocity retention | Does the pitch retain an acceptable amount of that pitcher’s fastball speed? |
| Arm-side movement | Does it move predictably toward the throwing-arm side? |
| Downward movement | Does it show useful downward action? |
Technology is optional. A catcher, coach, or training partner can observe direction and location. Slow-motion video can show whether the grip or delivery is changing between throws. Ball-tracking equipment can add velocity and movement measurements when available. These tools supplement rather than replace the pitcher’s report about comfort.
Recommended testing order
Test variables in this sequence:
- Seam placement
- Grip depth
- Pressure
Depth changes the way the baseball sits in the hand.
If the pitch stays straight
Compare the on-seam and just-inside-seam positions while keeping the target, effort, grip depth, and normal delivery as consistent as possible.
A straight result does not prove that the pitch was thrown incorrectly. Some pitchers produce less two-seam movement than others. A modest but repeatable distinction from the four-seamer may still be useful.
If repeated grip comparisons create no meaningful separation, the pitcher does not need to force the pitch into the arsenal. Continue developing fastball command and revisit the two-seamer later.
If the ball slips
First check whether the fingers are stretched too widely. Then test one adjustment:
- A slightly deeper hold
- A modest increase in overall pressure
- Direct seam contact for a clearer tactile reference
- A small thumb shift to improve balance
Avoid making all four changes together. A hard squeeze is not the only solution and may make the grip less comfortable.
If the pitch cuts toward the glove side
Return to the centered baseline grip and approximately even finger pressure. Check whether a large offset or finger-pressure change coincided with the different movement.
Do not assume one universal cause. Glove-side movement may reflect several interacting factors. Resetting the grip creates a cleaner reference for the next comparison.
If movement improves but strikes decline
Return to the last repeatable grip. Then try a smaller version of the adjustment that increased movement.
For example, if moving fully inside the seams produced more run but poorer command, test a position halfway between the original placement and the new one. Useful movement still has to be commandable.
If velocity falls substantially for that pitcher
Compare the grip with the pitcher’s own four-seamer under similar conditions. Investigate whether the velocity change coincided with:
- A harder squeeze
- A deeper hold
- Uncomfortable finger spacing
- Reduced throwing intent
- A deliberate attempt to steer the ball
These are possibilities to test, not automatic diagnoses. There is no universal velocity-loss target that every pitcher must accept. If the pitch loses meaningful speed without gaining useful, controllable movement, return to the previous grip.
If the grip is uncomfortable
Stop using that variation and restore the last comfortable setup. Remote written instruction cannot determine the cause of pain or persistent discomfort; those symptoms call for individualized assessment rather than further grip experimentation.
The decision rule is straightforward:
Keep the version that is comfortable, repeatable, commandable, and meaningfully different from the pitcher’s four-seam fastball.
The grip that produces the most dramatic single throw is not necessarily the best grip. The best version is the one the pitcher can use repeatedly.
Is a two-seam fastball the same as a sinker?
The terminology is not standardized. Some players, coaches, and instructional guides use two-seam fastball and sinker interchangeably. Others treat them as related but distinct pitches.
When a distinction is made, a coach may describe a sinker as having:
- More noticeable downward action
- A deeper grip
- A different pressure pattern
- A different release characteristic
- Some combination of those features
Another coach may call any fastball with a two-seam orientation and arm-side movement a sinker. GoRout, for example, describes the two-seam fastball as also being known as a sinker while acknowledging that some pitchers distinguish the two by grip and movement (GoRout’s pitch-grip guide).
For practical development, describe what the pitch actually does:
- Primarily runs: Its main feature is movement toward the throwing-arm side.
- Primarily sinks: Its most noticeable feature is downward action.
- Runs and sinks: It combines lateral and downward movement.
- Stays relatively straight: It does not yet create much separation from the four-seamer.
That description is more useful than insisting that one label is universally correct. A developing pitcher does not need to force wrist or forearm rotation to make the pitch match someone else’s definition of a sinker.
Return to the neutral setup whenever the process becomes complicated: two fingers along the narrow seams, thumb underneath, supporting fingers relaxed, and a normal fastball delivery. Make small, documented adjustments rather than trying to manufacture movement.
Pain or persistent discomfort is a reason to end the grip experiment and obtain individualized guidance from a qualified coach or healthcare professional. Written information cannot replace someone who can observe and evaluate the individual pitcher.
Should the fingers sit directly on the seams for a two-seam fastball?
They can, but they do not have to. Direct seam contact provides a clear tactile reference. Placing the pads just inside the seams on the adjacent leather is also a documented variation.
Compare both without changing the delivery. Keep the position that provides the best combination of comfort, security, command, and useful movement.
How tightly should you grip a two-seam fastball?
Hold it securely without unnecessary tension. The baseball should remain stable, but the hand and forearm should not feel rigid.
Begin near the pitcher’s comfortable fastball pressure. If the ball slips, test a modest pressure increase or a slightly deeper hold—one change at a time.
Why does my two-seam fastball stay straight?
The grip does not guarantee movement. Individual ball flight varies with seam position, pressure, hand characteristics, release, arm angle, and velocity.
Compare on-seam and just-inside-seam placement while leaving the delivery unchanged. If neither creates a useful distinction after repeated comparisons, prioritize fastball command rather than forcing wrist action.
Which way does a two-seam fastball move for right-handed and left-handed pitchers?
From the pitcher’s perspective, typical arm-side run moves:
- Right for a right-handed pitcher
- Left for a left-handed pitcher
The pitch may also show downward action. From the catcher’s or hitter’s perspective, the apparent horizontal direction is reversed.
Is a two-seam fastball grip the same as a sinker grip?
Sometimes. The terms overlap, and some coaches use them interchangeably. Others reserve “sinker” for a version with greater downward action, a deeper hold, a different release characteristic, or another grip variation.
Focus on observed flight rather than the label. The best version is not the pitch with the most dramatic movement; it is the one the pitcher can throw comfortably, repeat for strikes, and distinguish meaningfully from the four-seam fastball.