
A Pitching Mechanics Diagram You Can Use With Video
Follow the six phases of a baseball pitch with a text diagram, observable checkpoints, and a simple video review for youth and amateur pitchers.
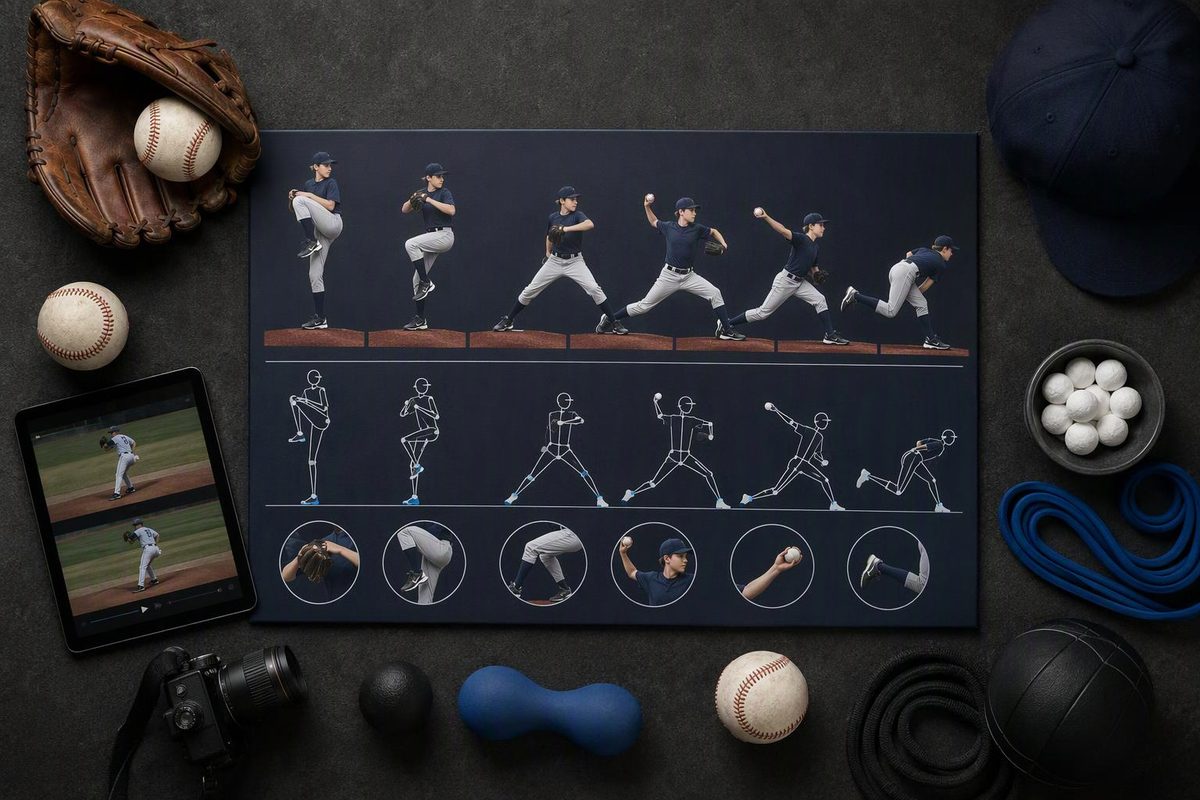
A pitching mechanics diagram is a map of the delivery—not six poses to hold. Use it to identify when something happens, then watch the complete pitch to see how the movements connect.
This guide is for youth and amateur overhand baseball pitchers. For a right-hander, the right leg is the pivot leg and the left leg strides toward home plate; reverse those labels for a left-hander.
The six-phase pitching diagram
A common biomechanical breakdown uses windup, stride, arm cocking, arm acceleration, arm deceleration, and follow-through. The landmarks below mark the boundaries between those phases. They describe the motion rather than prescribing ideal joint angles. See the published six-phase diagram and its viewing perspectives.
START: pitcher at rest
    │
    │  1. WINDUP / INITIAL MOVEMENT
    ▼
Maximum height of the lifted knee
    │
    │  2. STRIDE
    ▼
Stride foot contacts the ground
    │
    │  3. ARM COCKING
    ▼
Throwing shoulder reaches its greatest external rotation
    │
    │  4. ARM ACCELERATION
    ▼
BALL RELEASE
    │
    │  5. ARM DECELERATION
    ▼
Throwing shoulder reaches its greatest internal rotation
    │
    │  6. FOLLOW-THROUGH
    ▼
Delivery finishes
External rotation here means the throwing shoulder rotates so the forearm lays back during the delivery. Internal rotation is the rapid rotation in the opposite direction as the arm comes forward and continues after release. Do not manually pull the arm into either position.
“Windup” is also the name of a pitching setup. In this diagram, it labels the opening phase of motion; a pitcher working from the stretch still has an initial movement before striding. The knee-height landmark does not require a high leg lift. For setup details, use the separate guides to pitching from the windup or pitching from the stretch.
What to watch at each phase
Use these as observation prompts, not pass-or-fail rules for every pitcher. Basic coaching guidance emphasizes body control, movement toward the plate, release out front, and a balanced finish; those themes appear in this pitching-delivery coaching handout.
| Phase | Observable checkpoint | Simple practice cue |
|---|---|---|
| Initial movement | Can the pitcher lift the stride leg without an obvious stumble or extra reset? | “Start under control.” |
| Stride | Where does the front foot land relative to the target, and does that location repeat? | “Move toward the mitt.” |
| Arm cocking | After foot contact, watch the body turn and the arm continue moving—not just one frozen elbow position. | Watch this phase with a coach rather than forcing an arm pose. |
| Acceleration | Identify the last frame with the ball in hand and the first with it free. | “Throw to the target.” |
| Deceleration | Does the throwing arm continue moving after the ball leaves? | “Let the arm continue.” |
| Follow-through | Can the pitcher regain balance and prepare to field? | “Finish ready.” |
Do not turn an observed stride length into a universal target. A systematic review of healthy youth pitchers reported stride lengths ranging from 66% to 85% of pitcher height—a description of study results, not a prescription for your pitcher. Youth pitching mechanics review
Use the diagram with existing practice throws
- Record from a safe location. A side view helps locate knee height, foot contact, release, and finish. Keep the whole body visible. Keep the camera and observer out of the ball’s path; use a protective barrier for any view toward the pitcher.
- Watch at normal speed first. Look at the rhythm of the complete delivery before stopping frames. Slow motion helps locate events, but do not treat a phone frame as a precise measurement of shoulder rotation or joint stress.
- Compare several throws by the same pitcher. Note the target, pitch location, landing spot, and finish. Ask whether a pattern repeats rather than diagnosing a single miss.
- Choose one cue. Try it during already-planned throwing, then check whether command and body control improve. Do not rebuild the delivery from six isolated poses.
For ages 9–12, keep this work centered on basic delivery and fastball/changeup command, consistent with Pitch Smart’s age-group guidance. Older amateurs can use the same review method without copying a professional pitcher’s positions.
Mechanics review does not create extra throwing allowance. Fit it within the pitcher’s existing workload and follow age-based pitch-count and rest guidance. Stop throwing for arm pain or fatigue; seek medical evaluation for pain rather than trying to fix it with a diagram. ASMI identifies competitive pitching volume and pitching while fatigued as strongly linked to adolescent injury. ASMI position statement